This is legacy documentation covering MuJoCo versions 2.0 and earlier. Updated documentation is available from DeepMind at www.mujoco.org
Chapter 8: MuJoCo Plugin and Unity Integration
Introduction
MuJoCo can be described as a great physics simulator with decent rendering. Game development tools such as Unity and Unreal Engine can be described as great rendering engines with decent physics. The goal of the MuJoCo Plugin and Unity Integration package is to combine the best of both worlds: use MuJoCo physics and Unity rendering within the same project.
While the software release is an integrated package, it actually has two distinct components: the MuJoCo Plugin which is a new flavor of MuJoCo (in addition to Pro and HAPTIX) and is free; and the C# scripts for integration with Unity. The plugin can also be used to integrate MuJoCo with other rendering engines such as Unreal Engine. The overall approach would be similar, except the C# scripts we provided will have to be replaced with C++ code.
Beyond physics simulation and rendering, one has to implement control functionality that generates behaviors. MuJoCo users currently do this on their own (often using a Python wrapper for MuJoCo Pro) while game developers usually do it within the framework of their game engine. The workflow we envision here is closer to the MuJoCo use case: the executable generated by Unity receives MuJoCo model poses over a socket and renders them, while the actual physics simulation and behavior control take place in the user's environment running MuJoCo Pro. This is why we use the terms "game engine" and "rendering engine" interchangeably: we are aware that modern game engine do more than rendering, but here we only use their rendering capabilities as well as their sophisticated visual editing tools. Thus the present version of the software is not suitable for more traditional game development, however we are considering future extensions which will make it suitable, see Gaming.
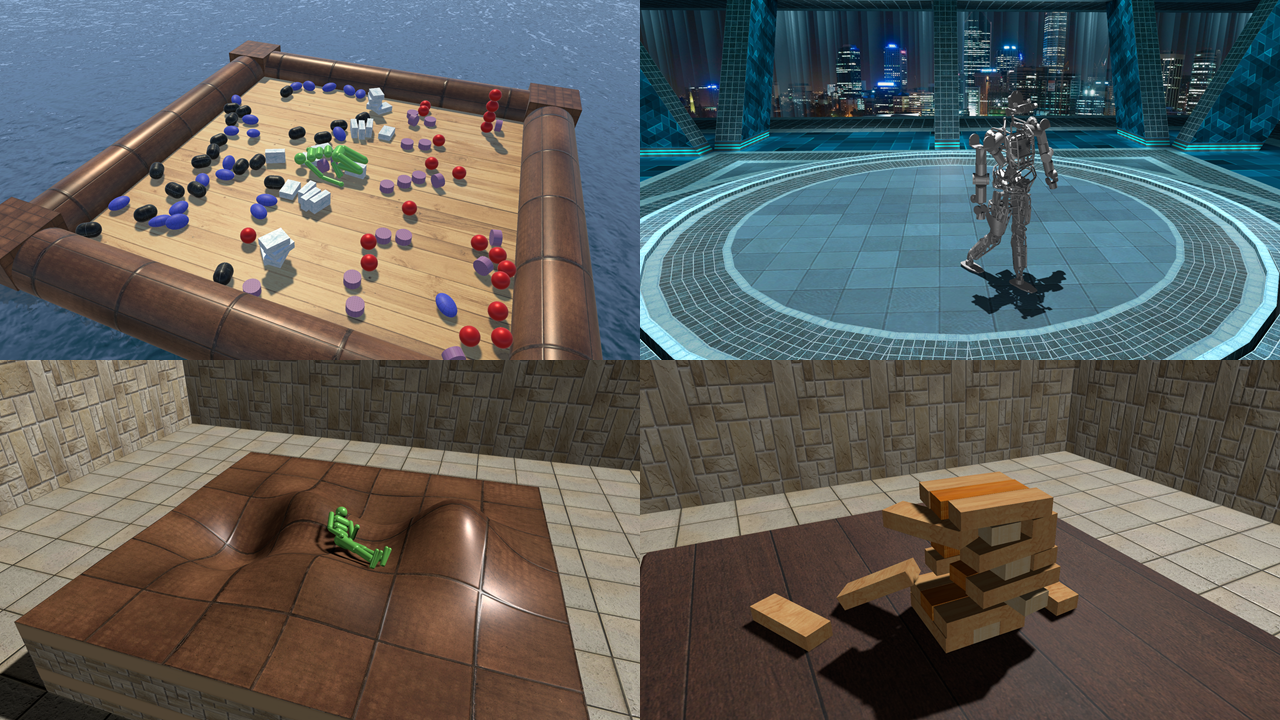
Below are some of the images produced by the interactive demo included in the release. To create this demo we started with a static scene from the Unity Asset store, imported a MuJoCo model with the Import script, adjusted the appearance of the MuJoCo model elements in the Unity Editor, added Unity-specific elements that only affect visualization (e.g. lights, water), and produced a Unity executable which incorporates the Simulate script as well as the MuJoCo Plugin.
Files
The software has the following directory structure on Windows. The MacOS and Linux releases are similar except for file extensions. Note that the Plugins directory contains shared libraries for all operating systems. This is because Unity can generate executables for multiple targets (for example we generated the Windows, MacOS and Linux demos using the Windows version of Unity).
mjuni155
    Tools
        Plugins                 - COPY this directory to the Assets directory of your Unity project
            mjplugin155.dll     - MuJoCo Plugin for Windows
            mjplugin155.bundle  - MuJoCo Plugin for MacOS
            libmjplugin155.so   - MuJoCo Plugin for Linux
        Scripts                 - COPY this directory to the Assets directory of your Unity project
            MJP.cs              - C# wrapper for MuJoCo Plugin
            MJImport.cs         - C# UnityEditor script for importing MuJoCo models
            MJSimulate.cs       - C# MonoBehavior script for simulating passive MuJoCo dynamics
            MJRemote.cs         - C# MonoBehavir script for rendering poses received over a socket
        Models                  - collection of MuJoCo XML models used in the demos
        Extras                  - additional files, not directly needed in Unity projects
    Demos
        simulate.exe            - simulate MuJoCo physics with mouse perturbations
        remote.exe              - render MuJoCo model with poses received over a socket
        mjremote.py             - Python class implementing the user end of the socket
        testremote.py           - example using the Python class to connect to remote.exe
        ... many other files needed by the Unity executables; don't worry about them ...
All files available as source as listed below, with a brief description of their role. More extensive documentation is provided later.
- mjplugin.h (source)
- This is the C/C++ header for the MuJoCo Plugin. It is not actually used in Unity projects because Unity requires C# integration (see MJP.cs below). This header is provided in case users want to incorporate the MuJoCo Plugin in their own projects outside Unity. For example, it could be used to integrate MuJoCo with Unreal Engine which is based on C++ rather than C#. Note that, unlike projects involving MuJoCo Pro, the MuJoCo Plugin is self-contained and does not include any of the standard MuJoCo headers.
- MJP.cs (source)
- This is the C# "header" for the MuJoCo Plugin. C# does not support actual headers, so instead we have wrapped the plugin API in a static C# class. This file is in one-to-one correspondence with mjplugin.h above. It is used in all the other C# scripts to access MuJoCo functionality.
- MJImport.cs (source)
- This is an EditorWindow script. It creates a "MuJoCo Import" menu item under the Window menu in the Unity Editor. It is used to import a MuJoCo model into a Unity scene, and instrument the scene for ether local simulation or remote rendering.
- MJSimulate.cs (source)
- This is a MonoBehavior script. It is used at runtime to simulate the passive dynamics of the MuJoCo model, as well as to provide mouse interaction and image/video saving.
- MJRemote.cs (source)
- This is a MonoBehavior script. It is used at runtime to connect to a remote TCP client, accept MuJoCo poses, run forward kinematics, and render the corresponding images. It can also return data to the TCP client, including the images being rendered.
- mjremote.py (source)
- This is a standalone Python class that implements the TCP client side expected by MJRemote.cs. It sends model poses to the Unity executable and requests remote rendering. Note that the user is expected to have a separate MuJoCo simulation running in their Python environment, which will provide the model poses being sent to the remote Unity renderer.
- testremote.py (source)
- This is a standalone Python script that tests the remote rendering functionality. With the Unity remote renderer running, execute this script in Python and it will connect to the renderer and measure the frame rate at which images can be obtained over the socket. The image size is specified in the MuJoCo model as offscreen resolution.
Workflow
The goal of this software is to combine MuJoCo physics and Unity rendering. This is challenging because MuJoCo and Unity were not designed to work together. In particular, MuJoCo has its own renderer which is aimed at scientific visualization with fixed-function OpenGL, and lacks many of the features available it the Unity renderer. Similarly, Unity relies on a previous-generation physics simulator and lacks many of the simulation-related capabilities of MuJoCo (not so much in terms of features but in terms of simulation speed, accuracy and stability). Instead of trying to reconcile this partly-overlapping functionality, we made a design choice which is somewhat drastic but nevertheless we believe it is the right choice.
Here MuJoCo is used exclusively for physics and its rendering is altogether ignored. Unity is used exclusively for rendering and its physics are altogether ignored. The MuJoCo and Unity representations of the same model are connected at the level of geometry. In particular, MuJoCo exports a list of "renderable objects" corresponding to MuJoCo model elements. These are imported as meshes in Unity (or as geometric primitives when possible). Unity sees them as static meshes which will be animated by a user script, and which do not collide, send events or otherwise interact with other Unity elements. Thus the corresponding GameObjects do not have Collider or Rigidbody components attached to them. At runtime the MuJoCo Plugin provides the positions, orientations and scales of all renderable objects, which determine the corresponding GameObject transforms in Unity. The scripting capabilities of Unity are not used to modify these properties (doing so will introduce a discrepancy between the MuJoCo simulation and the Unity rendering).
With these preliminaries in mind, the workflow enabled by the software is as follows.
- Start Unity project
- Create a new Unity project or open an existing one. Copy the directories Plugins and Scripts from the software release to the Assets directory in your Unity project. This will cause the Unity Editor to compile the scripts and generate the meta data it needs. Since one of the scripts is an EditorWindow, it will create a new menu item under the Window menu in the Unity Editor, called "MuJoCo Import". The resulting window is shown under Import below.
- Import MuJoCo model into Unity scene
- The Unity scene may contain just the MuJoCo model, or the MuJoCo model plus other assets (from the Unity Asset store or elsewhere). If it is the latter, we recommend creating a scene with the necessary assets first. Then import the model using the MuJoCo Import described above. This will add GameObjects with corresponding meshes in the scene, as well as any materials or textures from the MuJoCo model. It will also compile the MuJoCo XML and save it as an MJB file in the StreamingAssets directory in your Unity project. The MJB file is needed by the Unity-generated executable at runtime.
- Adjust visualization
- The imported MuJoCo model may look good out of the box, but usually it can be improved using the powerful Unity Editor. At this stage you can import additional materials and textures or edit existing ones, assign them to the MuJoCo meshes, add lights, post-processing effects etc. If you loaded other assets it the scene (say a well-decorated room where you want your MuJoCo model to appear), you may need to move and scale the MuJoCo model relative to those assets. This can be done by selecting the MuJoCo GameObject (which is the root for all other objects imported from MuJoCo) and move, rotate and scale it as needed. If the MuJoCo model has a ground plane and your room has a floor with different shape, make sure the plane and floor are aligned, and then delete the MuJoCo plane object. In general you can delete any of the renderable objects imported from the MuJoCo model, and the plugin will control the positions and orientations of whatever is left (without complaining about missing objects).
- Produce Unity executable
- Once you are satisfied with the appearance of your MuJoCo/Unity model, build an executable. There are two different kinds of executable: simulate and remote. The type is specified at import time. The importer attaches the corresponding script (MJSimulate.cs or MJRemote.cs) to the root MuJoCo object, and sets the public script parameters. You can also do this attachment manually later.
- Run simulation executable
- The simulation executable simulates the passive dynamics of the MuJoCo model. You can use the mouse to control the camera, select MuJoCo objects, and apply forces and torques to them - same mouse mechanism as in MuJoCo HAPTIX and Pro. Press F1 to see a help window summarizing the mouse commands and keyboard shortcuts, as shown under Demos. Note that you can simulate while editing, using the Game window in the Unity Editor. This is a great feature that helps with visual design, and we found ourselves using it all the time. In case you were wondering, no, you cannot control the MuJoCo simulation beyond using mouse perturbations. This is because the MuJoCo Plugin is free, and if it provided general simulation functionality, there would be little reason to purchase MuJoCo Pro. For a possible non-free future plugin, see Gaming.
- Run remote executable
- The remote executable starts a TCP listener (on address and port specified at Import time), and also renders the scene and enables mouse interactions. This is a passive renderer. It changes the model pose only when new data arrive over the socket (see mjremote.py for user-side socket communication). Mouse perturbations as well as any key presses are still recorded and sent over the socket, but are not applied to the local model; instead the user can apply them on their end and then update the model pose accordingly. The executable can also save PNG snapshots and raw video frames, as well as send the images back to the user over the socket (the simulate executable also has this image-saving functionality).
Demos
The release includes two demos: remote and simulate. The remote demo renders the standard MuJoCo humanoid. When you run it the label "Waiting" appears in the top-left corner, meaning that it is waiting for socket connection. Now if you run the script testremote.py in Python, you will get a response with several size parameters (numbers of elements, width and height of the offscreen image) as well as the frame rate at which the images are received over the socket. In this case the image resolution is 640x480. This is the offscreen rendering resolution as specified in the MuJoCo model, and is independent of the Unity window size. On our Windows machine with Quadro P5000 video card (roughly equivalent to GTX 1080) we get 335 frames per second over the socket at this resolution. Unity itself is able to render at around 1400 FPS, and the difference is due to sending data around (we are using localhost so the communication should be optimized by the OS, but still, this is a lot of data). Smaller images (say 100x100) can be sent at speeds close to the GPU rendering limit. This can be useful for computer vision applications and machine learning applications.
The simulate demo is the more exciting one. It contains 10 different scenes (or levels) which are loaded by pressing Shift 0-9. The full set of mouse and keyboard commands is shown in the Help window, as follows:
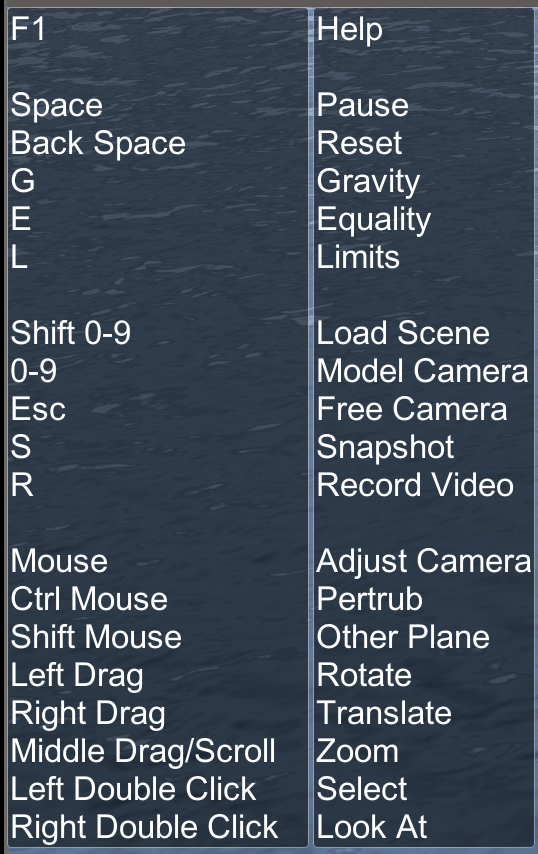
The keys G, E, L enable and disable gravity, equality constraints, and joint and tendon limits respectively. Disabling gravity in particular causes interesting motions. The mouse is used to adjust the default (free) camera as well as select objects and apply perturbations to them. Using perturbations, you can pull selected objects and make them move around. If the perturbations make the simulation unstable, it will reset automatically (it is not easy to make this happen, but try it).
You can also record individual snapshots as PNG files at the offscreen resolution specified in the model. The resulting files are numbered sequentially and saved in the directory where the executable is (except on MacOS where they appear under Contents/Resources in the bundled application folder). If you start video recording, raw video frames will be saved in a video file at around 60 FPS. To turn this file into an MP4, you can use ffmpeg as follows:
ffmpeg -f rawvideo -pixel_format rgb24 -video_size 640x480
       -framerate 60 -i video_0.raw -vf "vflip" video_0.mp4
Versions
The software described here is built around MuJoCo 1.55, which is an internal version of MuJoCo that will not be publicly released. The XML model format is the same as in 1.50, so the XML model collection provided in the release can be used with MuJoCo Pro 1.50 for remote rendering. However the compiled MJB models in the StreamingAssets directory in the demos are not compatible with MuJoCo 1.50. Do not attempt to replace those file with your own MJB files. Instead, use the Import script in Unity. It will automatically call the MuJoCo Plugin 1.55 to compile the XML and save it as MJB 1.55 in the StreamingAssets directory (which the Unity executable will then load via the plugin). As long as you follow these instructions, the fact that the plugin is built around a future version of MuJoCo is not an issue. Once MuJoCo Pro 1.60 is released, the plugin will be updated and going forward MuJoCo Plugin and MuJoCo Pro will have the same version numbers.
Components
Here we provide a more technical description of the components included in the release. This complements the user guide description above, even though it is not full reference documentation (the commented source files should be used as reference documentation).
Plugin
The MuJoCo Plugin introduced with this release is a new flavor of MuJoCo, in addition to MuJoCo HAPTIX and MuJoCo Pro. It is a free shared library that does not require an activation key. Its goal is to help integrate MuJoCo physics with external rendering engines. The rest of this release integrates it with Unity, but other targets are also possible. The integration philosophy is to expose all geometric data, so that MuJoCo can handle physics while the external renderer handles rendering. Since the MuJoCo Plugin is free, its functionality has been carefully limited so that it is useful for rendering integration but cannot be used to replace MuJoCo Pro for simulation. In particular, the only compute capabilities it exposes are forward kinematics used for remote rendering, and passive simulation with mouse perturbations to help explore the model during visual editing. It is technically straightforward to expose additional functionality, and we plan to do so in the future; see Gaming below.
Apart from hiding MuJoCo Pro's simulation capabilities into a free product, the MuJoCo Plugin provides substantial convenience as compared to wrapping MuJoCo Pro directly (into C# or another rendering integration project). The Plugin API is fully self-contained and does not include the MuJoCo headers, so it is much easier to learn. Furthermore, it organizes all MuJoCo model elements that may need to be rendered into a list of "renderable objects" and exports their geometry and visual properties, and then at runtime it sets their positions and orientations. These objects correspond to MuJoCo geoms, sites, spatial tendons (which can have multiple segments each), as well as special perturbation objects. At runtime the Plugin informs the renderer if each object should be shown or hidden, and if it should be highlighted (used for body selection in MuJoCo).
The C/C++ API to the Plugin is provided in the file mjplugin.h. The C# API is provided in the static class MJP.cs. The latter is used for Unity integration.
Import
Importing a MuJoCo model in a Unity scene is done by the C# script MJImport.cs. This is derived from EditorWindow, meaning that it extends the Unity Editor and cannot be used at runtime. Once this script is copied under the Assets directory, Unity will compile it and a new menu item "MuJoCo Import" will appear under the Window menu. The resulting window is shown below.
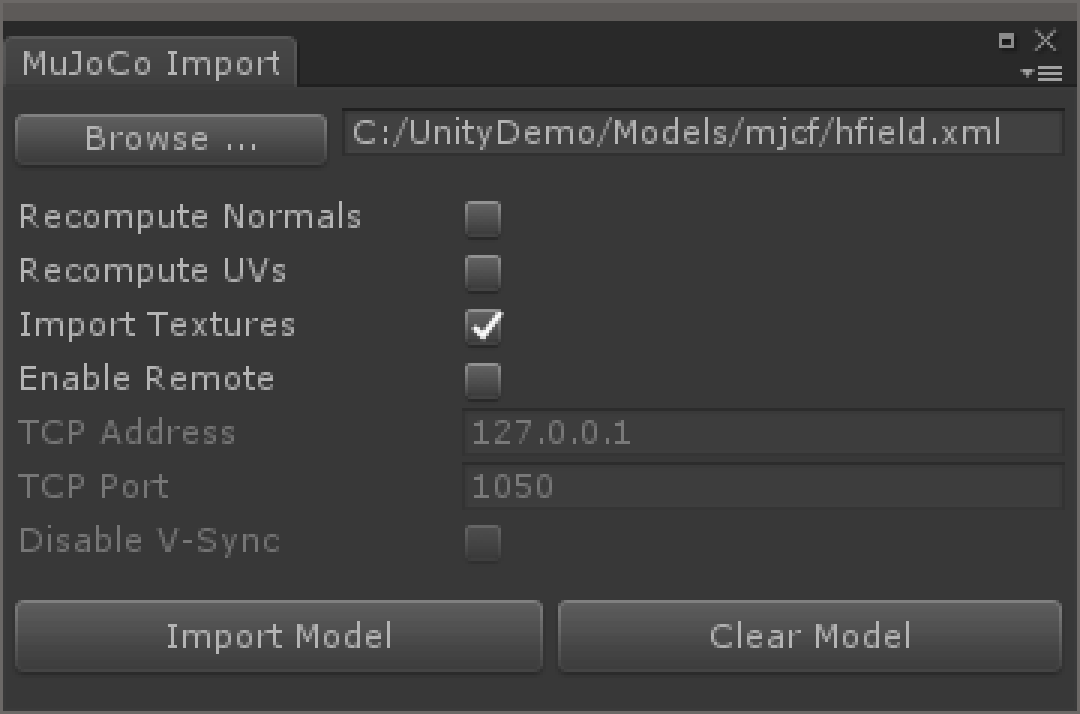
First specify the MuJoCo model file name, or use Browse. This could be any model that MuJoCo can load, although note that the Plugin uses an intermediate version of MuJoCo (1.55) so MJB models compiled with prior versions will not work. However MJCF and URDF models compatible with MuJoCo 1.50 can be imported. The import script will use the Plugin to compile and save the MuJoCo model into an MJB file in the StreamingAssets directory, which will then be used at runtime.
The import script has several options exposed in the window. Import Textures can be enabled or disabled (since the Unity user is likely to replace the MuJoCo textures). Materials on the other hand are always imported. This is because even if the Unity user plans to edit them, materials are a good way to group multiple MuJoCo objects and control their appearance jointly. Recompute Normals can be used to recompute the mesh normals after importing them from MuJoCo. This is not usually necessary, but may improve appearance in some cases. Recompute UVs is a more dramatic step, and can be quite slow for models with large meshes. It uses the Unity Editor function Unwrapping.GeneratePerTriangleUV() which makes an uncompressed list of vertices (i.e. the number of vertices becomes 3 times the number of faces). The resulting uncompressed mesh then replaces the mesh imported from MuJoCo. It has the same geometry but the UV coordinates may be better for texture mapping. Note that this is only relevant to MuJoCo models that have meshes. Geometric primitives are imported in Unity as primitives (sphere, cube, ellipsoid, cylinder, plane) and in that case Unity uses its built-in meshes and UV coordinates.
The option Enable Remote determines if the executable (built later) will use simulation mode or remote mode. When enabled, the additional options TCP Address, TCP Port and Disable V-Sync become available. If remote mode is used to obtain images over the socket at maximum speed, V-Sync should be disabled. If it is only used for visualization, it is better to leave V-Sync enabled (otherwise the GPU will be maximally loaded for no good reason).
Once all the script options are adjusted, press the Import Model button. This will call the Plugin to obtain the lists of materials, textures and renderable objects; create an empty GameObject called MuJoCo; and then create a separate GameObject under MuJoCo for each renderable object provided by the Plugin. It will also attach either MJSimulate.cs or MJRemote.cs to the MuJoCo GameObject, so that when the executable is compiled it works in the desired mode. This attachment can be changed manually after Import.
After Import is done, the Unity user can edit the scene and make it look better. The transform of the root MuJoCo GameObject can be translated, rotated and scaled. This determines how the MuJoCo world fits in the Unity world. Such editing is needed when the MuJoCo model is being inserted in some pre-existing static background.
The code of MJImport.cs is relatively straightforward. The only subtle part are the mesh and height field processing. MuJoCo height fields are imported in Unity as meshes rather than terrains. So the import script needs to generate a mesh from the elevation data provided by MuJoCo. Note that in addition to the surface, we also generate "skirts" covering the sides of the surface. These are represented as a submesh, which will not have a material assigned to it initially (so it will be invisible). To make it visible, add a second material to the corresponding GameObject. The last scene in our demo illustrates the use of a height field.
Simulate
The script MJSimuate.cs is used at runtime for passive simulation with mouse peturbations. The mouse commands correspond to the MuJoCo convention and are very different from the Unity convention. In particular, MuJoCo is about focusing on the model while Unity is about exploring the world. So in MuJoCo, the camera rotates and zooms relative to the LookAt point, which can be set with right double-click. This is implemented in the function ProcessMouse(), which records the input state of Unity and sends it to the Plugin.
The main part of the Simulate script "connects" the MuJoCo and Unity worlds at startup, and then updates the Unity GameObejct transforms to reflect the MuJoCo simulation in each frame. The connection is established using the names of GameObjects under the MuJoCo root GameObject. The Plugin provides the same list of renderable objects as it did during Import. If the Unity user deleted some of the imported objects that is fine; these objects are simply ignored during Update().
The functions SetTransform() and SetCamera() implement coordinate transformations from MuJoCo to Unity. Note that MuJoCo uses a right-handed frame where Z is up, while Unity uses a left-handed frame where Y is up. The import script also takes this into account when importing mesh data.
The actual simulation is done in the FixedUpate() function. This is where Unity normally handles physics simulation. except here we bypass the physics built into Unity and instead call the MuJoCo Plugin. The Import script set the fixed time step to 5 msec, so this update occurs more often than the per-frame update. The MuJoCo simulation is done with the function MJP.Simulate() which advances the simulation state until the current Unity time.
Remote
The script MJRemote.cs has a lot in common with MJSimuate.cs. The differences are that it calls MJP.Kinematics() instead of MJP.Simulate() because here the model pose is provided externally, and of course it implements a socket server. The latter is done with the C# TcpListener and TcpClient sets of functions. The server implementation is in Update(). For details of the assumed communication protocol, please read the code in the Update() function, it is quite straightforward.
The other end of the socket can be implemented with any socket library/environment. We have provided a Python implementation in mjremote.py, which can be tested with testremore.py. From MATLAB one would use Java sockets to do the same. Again, this integration package is designed around the idea that the user will be running a MuJoCo Pro simulation in an environment of their choice, and sending the model poses (qpos and mocap_pos/quat) over the socket for rendering.
The remote renderer can also send data back to the user. In addition to images, it can send the last key pressed in the Unity window as well as the state of the perturbation object. Even though the renderer itself is passive, the user may want to implement an interactive simulator. This is done by getting mouse and keyboard commands from the renderer, applying the necessary forces or other perturbations to the MuJoCo Pro simulation, and then seding the resulting poses to the renderer.
Future Work
The current release of the MuJoCo Plugin and Unity Integration is in beta stage. It works well and is usable as is, but there is plenty of room for development. Here we discuss possible extensions, and also invite users to participate in this discussion on the MuJoCo Forum.
Fine-tuning
The beta release can be improved in some small ways, although overall it is quite polished and well-tested. Currently the offscreen rendering resolution is specified in the MuJoCo model, but it may be desirable to change this at runtime, especially in remote rendering mode. So we should implement another socket command that re-creates the offscreen rendering texture on the Unity side. The MuJoCo world transform can be edited by hand in the Unity Editor as described earlier, but it may be more convenient to specify this information in the MuJoCo model itself, in case the same model needs to be imported multiple times. This can be done in custom MuJoCo fields. On MacOS, the image and video files being recorded end up under Contents/Resources in the (hidden) directory corresponding to the application bundle. We should probably find a better location for them.
Export
Presently models are imported from MuJoCo to Unity. Can models be exported from Unity to MuJoCo? Given that Unity is designed around a different physics simulator which has a small fraction of the physics settings available in MuJoCo, the short answer is "not automatically". It is of course doable in a limited sense, but that would be as pointless as importing a MuJoCo model in Unity and not improving the visualization. However, a partial export is possible and we are likely to implement it with additional C# scripts in the future. One can create 3D objects in Unity and use the Editor to adjust their spatial properties, and then export to XML compatible with MuJoCo's file format (MJCF). The user will then edit the resulting XML by hand and add MuJoCo-specific fields to it, make sure the physics work well, and then import in Unity as is done now.
One challenge here is that the more interesting Unity assets we have seen are large meshes corresponding to rooms, buildings etc. MuJoCo uses the convex hulls of the meshes for collision detection. So if a large Unity mesh is exported to MuJoCo, it will not work as intended. Instead, one would have to break it down into walls, columns, floors etc. Fortunately, Unity assets are often designed with sub-meshes so as to allow application of different materials to different parts of the big mesh, and these sub-meshes may be sufficient to obtain the desired simulation model in MuJoCo.
Skinned Meshes
MuJoCo is a rigid-body simulator (with soft constraints but without modeling the details of the deformations). Unity can render skinned meshes, by animating an underlying skeleton composed of rigid bodies and adjusting the mesh vertices accordingly at each frame. So in principle we can drive skinned meshes in Unity with MuJoCo simulations. The MuJoCo Plugin is designed to support this functionality, and we already have some experimental C# scripts along these lines, but decided not to hold the rest of the release for it. Briefly, the Plugin exports the MuJoCo body positions and orientations relative their parent body, which is precisely what Unity needs to animate a skinned mesh. A non-trivial question here is, how do we get a MuJoCo model to correspond to a Unity skinned mesh in the first place? The answer is a special exporter which constructs rigid-body approximations to the bone-specific vertices of the skinned mesh, and exports them as STL files as well as writes a MuJoCo XML.
Universal Player
The intended workflow here involves the Unity Editor, meaning that for each MuJoCo model one has to do some work in Unity before a corresponding executable can be generated. The alternative would be to implement a universal Unity player of MuJoCo models. We did not choose this path because we see the Unity Editor as being a large part of the attraction of using Unity, and without manual adjustments it is unlikely that we can make MuJoCo models look much better than they already do in the native MuJoCo renderer. Using visually-rich scenes such as those in the demos would not be possible (since they cannot be represented in the MuJoCo model). On the other hand, the universal player approach is appealing because people not familiar with Unity can take advantage of this development. So it is possible that we will implement such a script in the future, essentially combining the functionality of MJImport.cs and either MJSimulate.cs or MJRemote.cs, and setting more visual properties automatically.
Gaming
Finally, can we use MuJoCo for gaming inside Unity? Here by gaming we mean not only traditional games, but also future games where the characters are controlled automatically based on learning algorithms instead of scripting. Functionally, one can implement such a game now: develop the learning algorithm and character controller in C/C++ or Python, make sure the simulation runs as expected in MuJoCo, and use the remote Unity renderer to visualize it (as well as receive user input from the mouse and keyboard and respond to it).
Going further, one can imagine extending this model by having tighter integration between MuJoCo and Unity. In particular, the MuJoCo Plugin could expose the now-hidden simulation functionality, so that Unity scripts can apply forces to MuJoCo bodies and obtain information about collisions and other physical interactions. Then running a parallel MuJoCo simulation in a different environment will no longer be necessary. The main reason we did not implement this in the initial release is because we wanted to have a free Plugin, allowing people to design Unity scenes corresponding to MuJoCo models and distribute the resulting executables. If the Plugin exposed the full simulation functionality, it would require activation of some sort (licensing scheme TBD). So the first step in this direction would be to release a plugin that relies on the usual MuJoCo Pro activation scheme; this would not be suitable for releasing games, but will enable people to start developing such games.
One step further would be to allow interactions between MuJoCo physics and other Unity elements. It is already possible to do this with the built-in physics: add Colliders to the MuJoCo meshes, add some Rigidbody GameObjects to the scene, and then Unity will use its built-in physics to make these bodies move out of the way of the MuJoCo bodies. If we exposed a way to set forces in the MuJoCo Plugin, the interaction could be made bi-directional. That being said, we think it is a bad idea to make two different physics simulators interact with each other (making one simulator interact with itself is already hard enough). So users should choose a simulator and stick to it in a given project.
There are however a number of Unity elements that respond to the motion of rigid bodies but do not apply forces back to these bodies. Such elements include water, particle systems, cloth. They can already be used in MuJoCo+Unity projects with the current release. Indeed our demo has water in the first scene. Objects do not get wet and slippery after being dipped in water, but the beauty of games is that players realize they are looking at a massive cheat and yet they don't care.